By clicking “Accept”, you agree to the storing of cookies on your device to enhance site navigation, analyze site usage, and assist in our marketing efforts. View our Cookie Policy for more information.
Icon Rounded Closed - BRIX Templates
Insights

Migration Strategies to Microsoft Purview: A Practical Guide for IT Leaders

5 mins
share on
 Migration Strategies to Microsoft Purview: A Practical Guide for IT Leaders

Organizations today face mounting pressure to protect sensitive data while navigating increasingly complex regulatory landscapes. Microsoft Purview helps organizations classify information using AI-driven sensitive-info detection and govern retention, audit, and compliance rules consistently across environments.

However, moving from legacy information management systems to Purview's modern capabilities requires careful planning and execution. This guide outlines practical migration strategies that address the most common pain points IT leaders face during this critical transition.

Before configuring policies, you need clarity on what you're protecting, who needs to be involved, and how your current environment is structured. If you haven't completed your legacy feature audit yet, start with our Week 2 Guide: Audit Legacy Features for Purview.

Assessment foundations to have in place:

  • Data classification strategy: Understand what sensitive information types exist in your environment and how they'll map to Purview's detection capabilities.
  • Governance baseline: Content sprawl undermines any migration. If your SharePoint and Teams environment lacks governance controls, address that first.
  • Stakeholder alignment: Purview migration touches IT, compliance, legal, and business teams. Use adoption campaign principles.
  • Copilot readiness connection: Understand how Microsoft Purview supports governance, oversharing remediation, and DLP decisions connected to Copilot.

Confirming Licensing Alignment Before You Configure

Understanding licensing distinctions is critical for migration planning. Misalignment here causes failed deployments and frustrated stakeholders. It's also recommended to confirm that you have the applicable licenses for the modern features.

E3 Licensing E5 Licensing
  • Baseline compliance features
  • Retention policies
  • Basic eDiscovery
  • Sensitivity labels
  • All E3 features, plus:
  • Advanced eDiscovery
  • Insider Risk Management
  • Communication Compliance
  • Enhanced DLP analytics

Critical licensing decisions:

  • There can be potential issues if the two tenants are at different licensing levels, especially if the acquiring tenant is at a lower licensing level.
  • Advanced eDiscovery workflows may not be available, forcing the new org to use basic search and export.
  • In regulated industries, downgrading from E5 to E3 could introduce compliance risks.

Action: Document which Purview features each policy requires, then map against your current licensing. Flag any gaps before configuration begins.

Configuring Data Loss Prevention Policies for Production

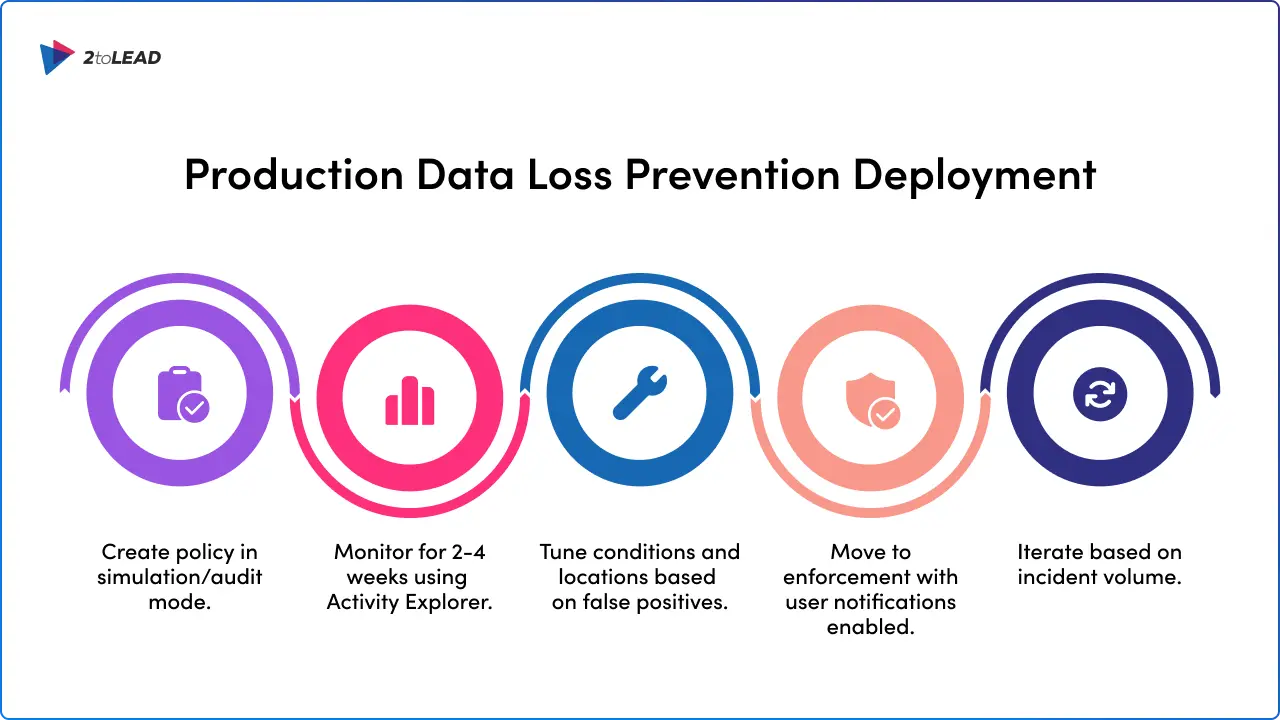
With your audit complete and licensing confirmed, DLP configuration is your first implementation priority. Start in simulation mode, then progress to enforcement.

DLP policy creation workflow:

  • Microsoft Purview Data Loss Prevention (DLP) policies include many configuration options. Each option changes the policy's behavior.
  • How you deploy a policy is as important as policy design. You have multiple options to control policy deployment.
  • This article shows you how to use these options so that the policy achieves your intent while avoiding costly business disruptions.

Platform constraints to plan around:

  • Maximum number of MIP + MIG policies in a tenant: 10,000
  • Maximum number of DLP rules in a tenant: 600
  • Maximum size of text scanned from a file: The first 2 million characters (~2 MB) of extractable text

Deployment sequence:

  1. Create policy in simulation/audit mode
  2. Monitor for 2-4 weeks using Activity Explorer
  3. Tune conditions and locations based on false positives
  4. Move to enforcement with user notifications enabled
  5. Iterate based on incident volume
Production Data Loss Prevention Deployment

Deploying Sensitivity Labels with Auto-Labeling

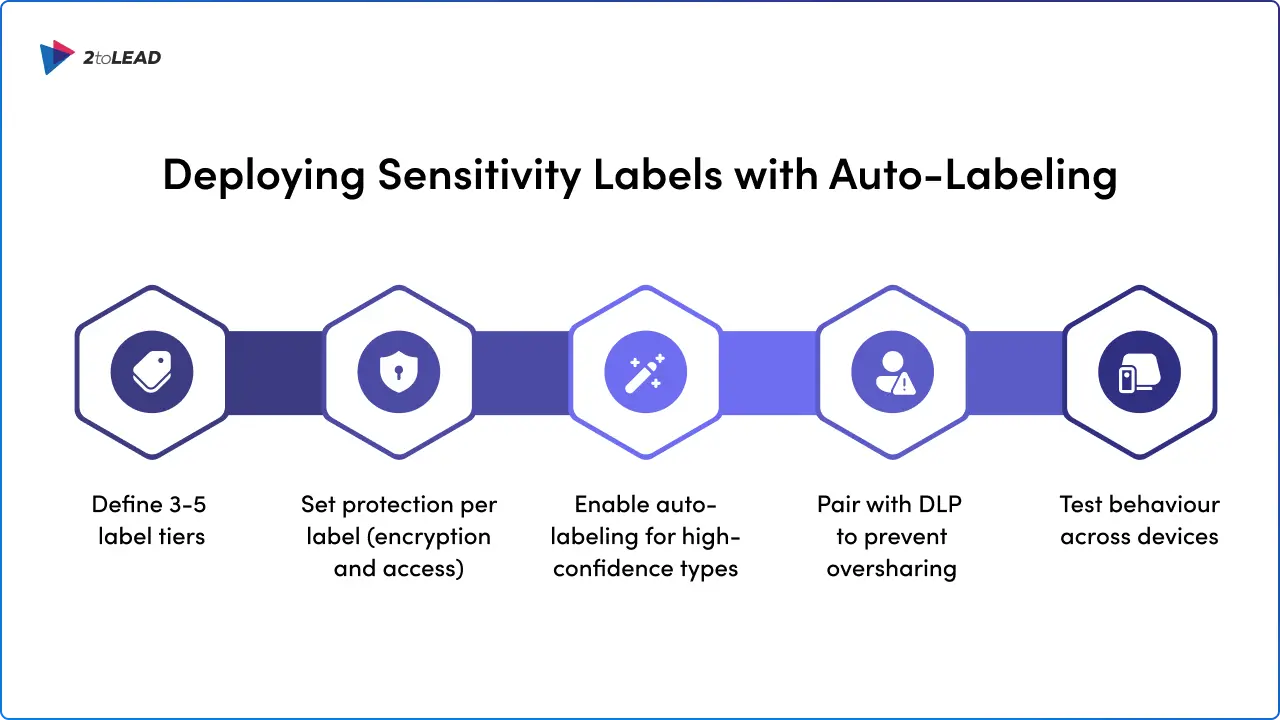
Sensitivity labels protect data at rest and in transit. Your implementation should balance user-driven labeling with automated classification.

Purview Information Protection classifies and labels data automatically, applying sensitivity labels that control access, encryption, and sharing permissions across SharePoint, Teams, OneDrive for Business, and beyond.

Why automation matters:

You no longer rely on employees remembering to label documents correctly; policies happen in the background, reducing human error. Sensitive customer data stays protected even if it leaves your environment.

Implementation checklist:

  • Define 3-5 label tiers (e.g., Public, Internal, Confidential, Highly Confidential)
  • Configure encryption and access restrictions per label
  • Enable auto-labeling for high-confidence sensitive information types
  • DLP policies prevent accidental sharing of sensitive information, such as credit card numbers or health data, whether inside Teams chats, emails, or uploaded to SharePoint
  • Test label behavior across devices (desktop, web, mobile)

Pro tip: Start auto-labeling in simulation mode on 2-3 high-risk document libraries. Review recommendations before enabling automatic application.

Deploying Sensitivity Labels with Auto-Labeling

Publishing Retention Labels and Policies

Retention configuration replaces legacy Information Management Policies. The process involves creating labels, then publishing them to locations.

Making retention labels available to people in your organization so that they can classify content is a two-step process: Create the retention labels. Publish the retention labels by using a retention label policy.

Adaptive vs. Static Scopes:

Decide before you create your retention label policy whether it will be adaptive or static. If you decide to use an adaptive policy, you must create one or more adaptive scopes before you create your retention label policy, and then select them during the create retention label policy process.

Publishing workflow:

  1. Sign in to the Microsoft Purview portal.
  2. If you're using records management: Solutions > Records Management > Policies > Label policies
  3. If you're using data lifecycle management: Solutions > Data Lifecycle Management > Policies > Label policies
  4. Select Publish labels and follow the prompts to create the retention label policy
  5. Be careful what name you choose for the policy, because this can't be changed after the policy is saved

Validating Your Migration with Activity and Content Explorer

Configuration without validation is incomplete. Use Purview's built-in tools to verify policies are working before decommissioning legacy controls.

Verify that your new features are working as expected: Wait for the applicable time period for your new features to take effect. Confirm policies applied to a location using policy lookup. Use activity explorer to review actions related to labeling content. Use content explorer to review labeled items. Check the policy status for errors.

Activity Explorer capabilities:

Activity explorer lets you monitor what's being done with your labeled content. Activity explorer provides a historical view of activities on your labeled content.

Available filters include:

  • Date range, Activity type, Location, Sensitivity label, User, Client IP, Device name, Is protected

Predefined filter sets for quick validation:

  • Endpoint DLP activities, Sensitivity labels applied, changed, or removed, Egress activities, DLP policies that detected activities, Network DLP activities, Protected Browser

Validation checklist:

Check Tool Success Criteria
Labels applying correctly Content Explorer Items show expected labels
DLP detecting sensitive data Activity Explorer Matches align with policy intent
Retention policies active Policy Lookup Status shows "On" with no errors
User notifications working Test Account Policy tips appear as configured
Auto-labeling accuracy Activity Explorer <5% false positive rate

Next Steps: Download Your Purview Migration Playbook

You've completed the awareness phase, the audit phase, and now the implementation phase. The next step is to operationalize your new Purview environment for ongoing governance.

At its core, Microsoft Purview is about giving businesses visibility and control over their information. Think of it as the nervous system for your data: it connects policies, compliance requirements, and classification labels across the many applications your people use every day.

Ready to put these strategies into action? We've compiled our proven migration framework into a step-by-step resource designed for IT leaders navigating their Purview journey.

Download the Purview-Powered Migration Playbook

Inside you'll find:

  • Pre-migration assessment checklists
  • Policy mapping templates for DLP, retention, and sensitivity labels
  • Licensing decision guides for E3 vs. E5 scenarios
  • Validation and testing frameworks
  • Stakeholder communication templates

Take the guesswork out of your migration. Get the playbook and start building your modern data governance foundation today.

Plan migrations with confidence and modernize governance with this playbook.
Case Study Details

Similar posts

Get our perspectives on the latest developments in technology and business.
Love the way you work. Together.
Next steps
Have a question, or just say hi. 🖐 Let's talk about your next big project.
Contact us
Mailing list
Occasionally we like to send clients and friends curated articles that have helped us improve.
Close Modal